In the Inovista Animator, the Attributes tab provides a wide range of
options which allow transitions that change color, opacity(transparency),
stroke values(borders) and in the case of a text element - the text
itself. There are also options, where applicable, to create Dash Array
transitions. Dash Arrays can be used to present interesting animations,
for example that draw a border around an element.
The attribute options that are presented depend on the type of element.
Group elements will only permit a change in opacity whereas a tspan
element will offer a full range of options including the ability to change
the text value.
Child Attributes
Parent Attributes
See Working Examples. Attribute Options
The full list of options are below. Note that not all options are available
for every element.
Opacity(0-1.0): The opacity(transparency) for the whole
element. '1' is completely visible and '0' is invisible. Values between
i.e. '0.5' will set the level of transparency.
Text: The text that is shown for TSPAN elements. If the value
is left blank, no changes are made to the text.
Color: The fill color sets the color inside the element. To
set the fill color, use the color button to open a color dialog editor
or enter the color in hex format i.e. '#ff0000'.
Fill Opacity: The opacity(transparency) of the inside of the
element. '1' is completely visible and '0' is invisible. Values between
i.e. '0.5' will set the level of transparency.
Stroke: A stroke is the border of the element. To set the
border color, use the color button to open a color dialog editor or
enter the color in hex format i.e. '#ff0000'.
Stroke Width: This is the width of the stroke(border) in
pixels.
Stroke Opacity: The opacity(transparency) of the border. '1'
is completely visible and '0' is invisible. Values between i.e. '0.5'
will set the level of transparency.
Dash Array: defines
the pattern of dashes and gaps used to paint the outline of the
element. For example, '4' alone will set a dashed border with each
dash 4 pixels long and a gap of 4 pixels between them. '4 1' will be
the same except the gap will be only 1 pixel.
Dash
Offset: defines the number of empty pixels before the border
begins. A value of '10' will mean the first 10 pixels are empty.
For non text element, the 'Offset Total Length' text shows the length of the
path border in pixels. For text, use trial and error to estimate the border
length.
Using Variables
As with almost all options within the Inovista Animator, the ability to
use variable values is available. Using variables allows the value to be
changed at runtime using the Animator API.
In the Attributes section, there are 2 additional steps involved in
entering variables as text. For the 'Text' and 'Dash Array' options you
still enter the text but you also need to select the checkbox below the
option. For 'Text' , this is 'Text is a Variable' and for 'Dash Array' it
is 'Array Text is Variable'.
To define a variable, enter a text value into the relevant textfield, i.e.
the 'Text' field.
Once a variable has been created, that variable name should appear in the
'Variable Values' section at the bottom of the editor section of the
Inovista Animator (left side). To run the image in the Animator, enter a
value into the textfield next to the variable name. Note that this value
will be the default when the image is exported. This value can be edited at
runtime.
The images below all contain
working examples of the points just mentioned. Please note that each image
must have a different SVG ID to ensure that there is no confusion about
which effects apply to any given image.
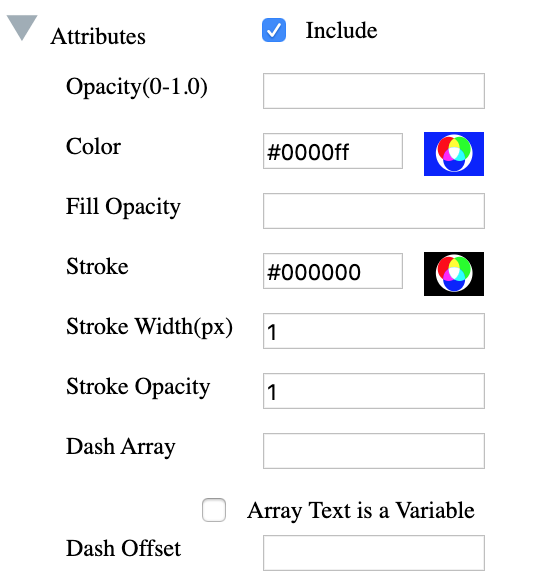
Change Color Fill
This example shows a transition that changes the Color Fill of the star
and adds a black stroke.
In the Attributes section of the Animator, scale values are setup as
shown below:
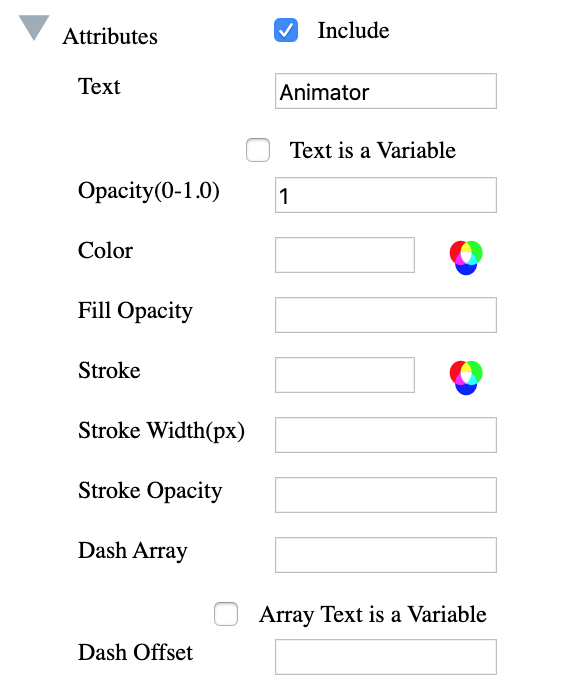
Change Text
This example runs two chained transitions. The first transition fades
the text in a TSPAN element by using 'Opacity' option for both stroke
and fill and setting it to '0'. The second transition changes the value
of the text and reverses the 'Opacity' back to '1'.
In the Attributes section of the Animator, the selected values for the
second transition are:
Note that the examples below use the setup option in the Element Tree to
initialize the Dash Array and Dash Offset. See Element
Tree for more details on how to do this.
Dash Array and Fill
This example shows a star with a color fill opacity of '0' and a stroke
with a Dash Array of 170px and a Dash Offset also of 170px. The Dash
Offset is setup using the initialize option in the element tree(click
the notepad icon). Two chained transitions are run. The first transition
sets the Dash Offset to 0px which gives the impression of drawing the
outline. The second transition sets the fill color to 'gold' and the
fill opacity to '1'.
In the Attributes section of the Animator,the first transaction is
as follows:
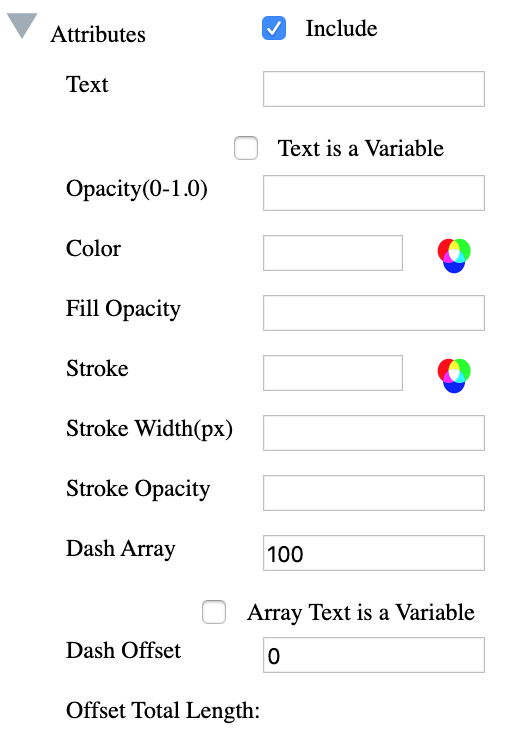
Dash Array with Text
This example uses a text TSPAN element to sketch the outline of some
text as a stroke and then changes the color fill opacity from '0' to
'1'. Using the edit element option (the notepad icon) in the element
tree, the image Dash Array is initialized to 100 and the Dash Offset to
100 .
In the Attributes section of the Animator, the first transaction is as
follows: