In the Inovista Animator, images can be moved within their containing background and parts of that image can be moved within the image and of course, both of these actions can be implemented to run simultaneously. Image transitions can also be chained, this means a sequence of transitions can be played one after another. A chained transition will be played the moment that the previous transition has completed. Note that using the 'delay' option can stall the start of the transition by the amount of time entered in the 'delay'.
The movement options are available in the Combined and Curve Transition sections.


This example shows the basic movement of the whole SVG image and an
element within that image (the ball). Movements can be positive or
negative and for both the x and y axes. For example, for the x axis a
negative value will move the object to the left and a positive to the
right.
There is also the option to move by pixel value or by percentage of
the containing parent. Here the SVG image moves based on the
percentage size of the background and the ball movements are defined
as actual pixels.
In the movement section of the Animator, basic movements are setup as
shown below:
![]()
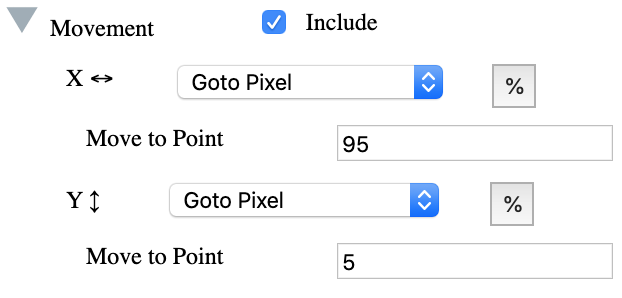
This example shows movement of objects to a specific point. The point
to move to can be defined either as a pixel or a percentage. Here the
SVG image is moved to a point based on a percentage of the background
size and the ball image is based on a pixel point in the SVG image
itself. For example, selecting 10% x for the SVG Image will move that
image to a point 10% across from the lefthand side.
In the movement section of the Animator, movements to a point are
setup as shown below:
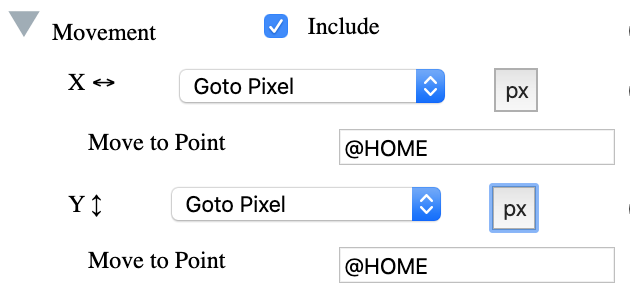
This example shows a chained movement. The first movement sends the
both the SVG Image and the ball contained within it to a random point.
The second movement uses the '@HOME' option to send that image back to
its original position. '@HOME' can be used for any of the movement
options and can also be used as a variable value. If '@HOME' is
selected for the x axis, the object will be moved to its original
horizontal position and to its original vertical position when
selected for the y axis.
In the movement section of the Animator, enter '@HOME' as shown below:
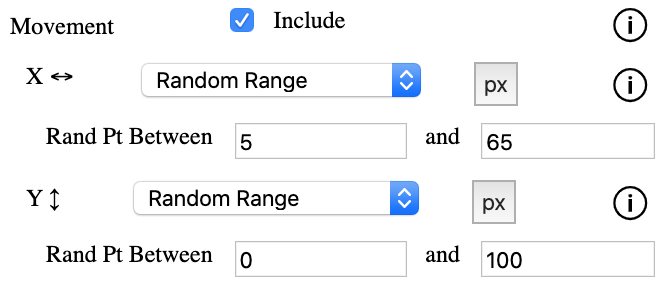
This example shows a chained random between movement. The first
movement sends the both the SVG Image and the ball contained within it
to a random point. The second movement repeats the same random motion.
This random motion works by setting a range either in pixels or
percentages. The object will move to a point in that range. For
example defining a between range on the x axis as 0% to 100%, the
object will move to a random point somewhere across the full width.
In the movement section of the Animator, setup random between motions
as shown below:
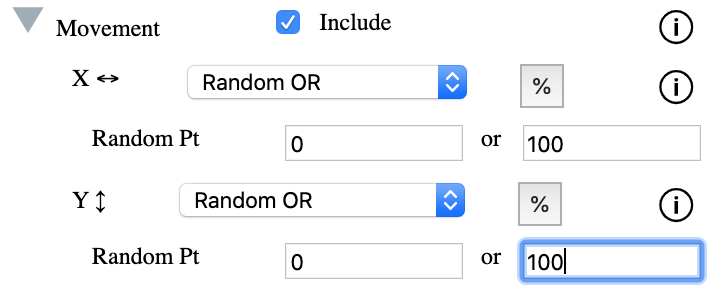
This example shows a chained random or movement. The first movement
sends the both the SVG Image and the ball contained within it to a
random point based on 2 values. One of the values is randomly
selected. The second movement repeats the same random motion. This
random motion works by setting a two values either in pixels or
percentages. The object will randomly move to one of those points. For
example defining a two values on the x axis as 0% and 100%, the object
will move to either the extreme left or the extreme right of the
background image.
In the movement section of the Animator, setup random or motions as
shown below: